*** Now offering SimBooth and Idra II Equipment!! ***

Build Your Home Golf Simulator — The Complete 2026 Guide
A home golf simulator lets you play real courses, track every shot, and practice year-round — without leaving the house. Whether you have a spare bedroom, a garage, or a dedicated basement, this guide walks you through every component, every decision, and every spec you actually need to know before buying anything.
Minimum space to swing a driver comfortably:
- Ceiling height: 9 ft minimum. 10 ft is comfortable for most golfers. Under 9 ft limits club selection (no driver for tall players).
- Width: 10 ft minimum. 12–15 ft is ideal — gives room for a full backswing without hitting side walls.
- Depth: 15 ft minimum from hitting position to screen. 18–20 ft is better for projector throw distance and safety.
Pro tip: Measure ceiling height at the hitting position, not just the middle of the room. Sloped ceilings in garages and basements catch people off guard.
Common room types that work:
- Two-car garage (most popular — typically 20×20 ft or larger)
- Basement (ceiling height is the main concern)
- Spare bedroom (may work for radar-based monitors that don’t need much depth)
- Dedicated game room or outbuilding
The 6 Core Components
1. Launch Monitor — The Brain of Your Simulator
This is the most important purchase decision. It tracks your ball and club data and feeds it to the simulator software.
Two main technologies:
- Radar-based (Doppler): Tracks the ball after impact using radio waves. Examples: Garmin Approach R10, Bushnell Launch Pro, FlightScope Mevo+. These typically need 8–10 ft of ball flight space behind the ball before losing signal — meaning you need depth in your room.
- Camera/photometric-based: Uses high-speed cameras to capture the ball at impact. Examples: Uneekor QED, Uneekor EYE XO2, Foresight GC3, GCQuad, Trackman. More accurate at shorter distances, better for tight spaces, generally more expensive.
Key data points a launch monitor tracks: Ball speed, club speed, launch angle, spin rate (total, backspin, sidespin), smash factor, carry distance, total distance, shot shape, attack angle, club path, face angle.
Entry-level (~$500–$1,500): Garmin R10, Rapsodo MLM2PRO — good for practice, limited data Mid-range (~$2,000–$4,000): Bushnell Launch Pro, FlightScope Mevo+ — solid accuracy, full simulator compatible High-end (~$5,000–$20,000+): Uneekor QED/EYE XO2, Foresight GC3/GCQuad, Trackman — commercial-grade accuracy
2. Impact Screen
This is what you hit the ball into. It also serves as the projection surface.
- Material matters: quality screens use multiple reinforced layers — typically a polyester mesh between protective outer layers. Cheap screens tear, bounce balls back dangerously, or degrade the image.
- Standard size: 9×7 ft, 10×8 ft, or 10×9 ft depending on your enclosure
- Look for: high-density stitch count, reinforced edges/grommets, and a matte surface for better image quality
- Gain rating: screens with a gain of 1.0–1.2 work best for most projector setups
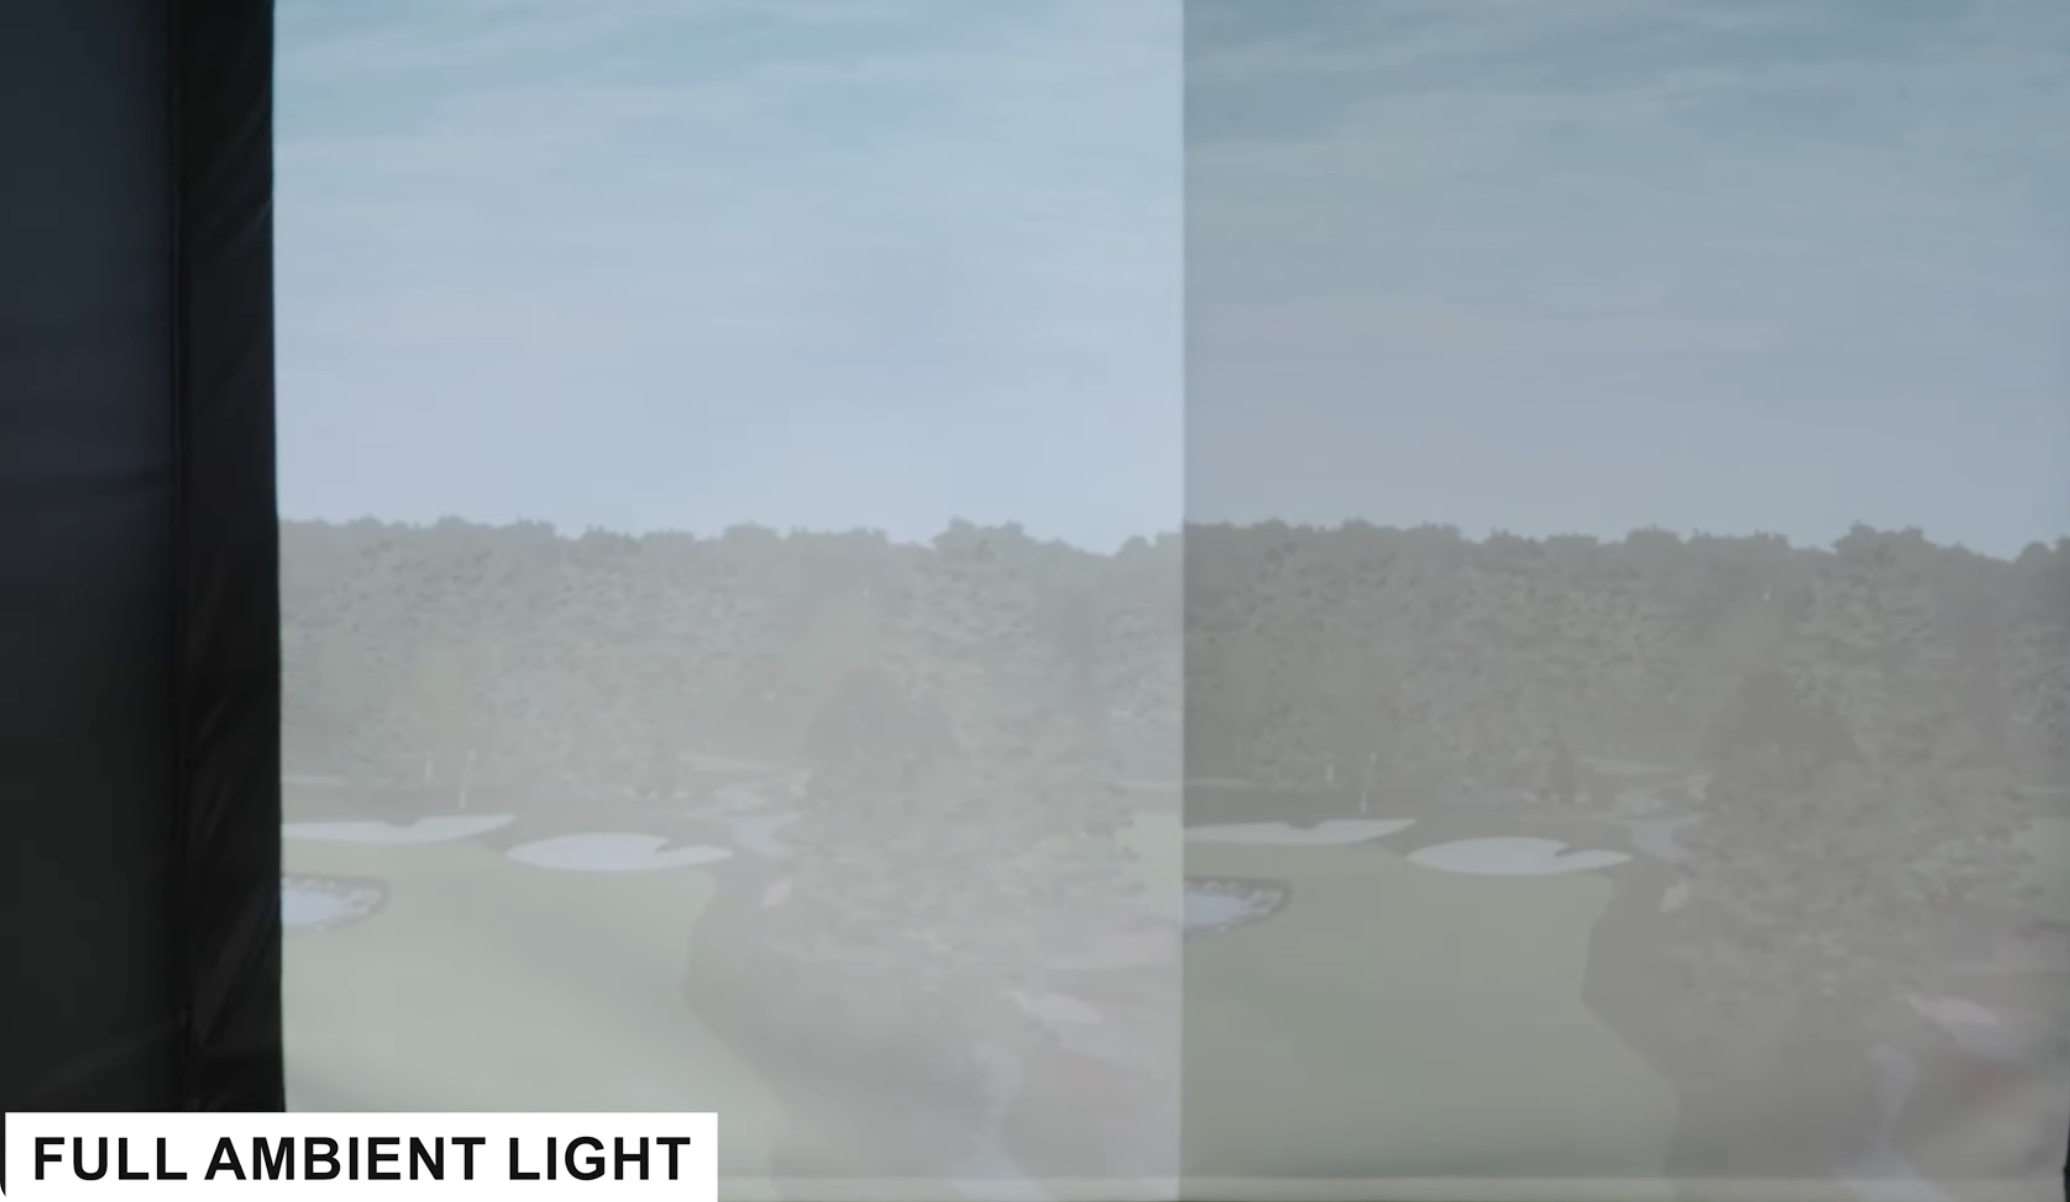
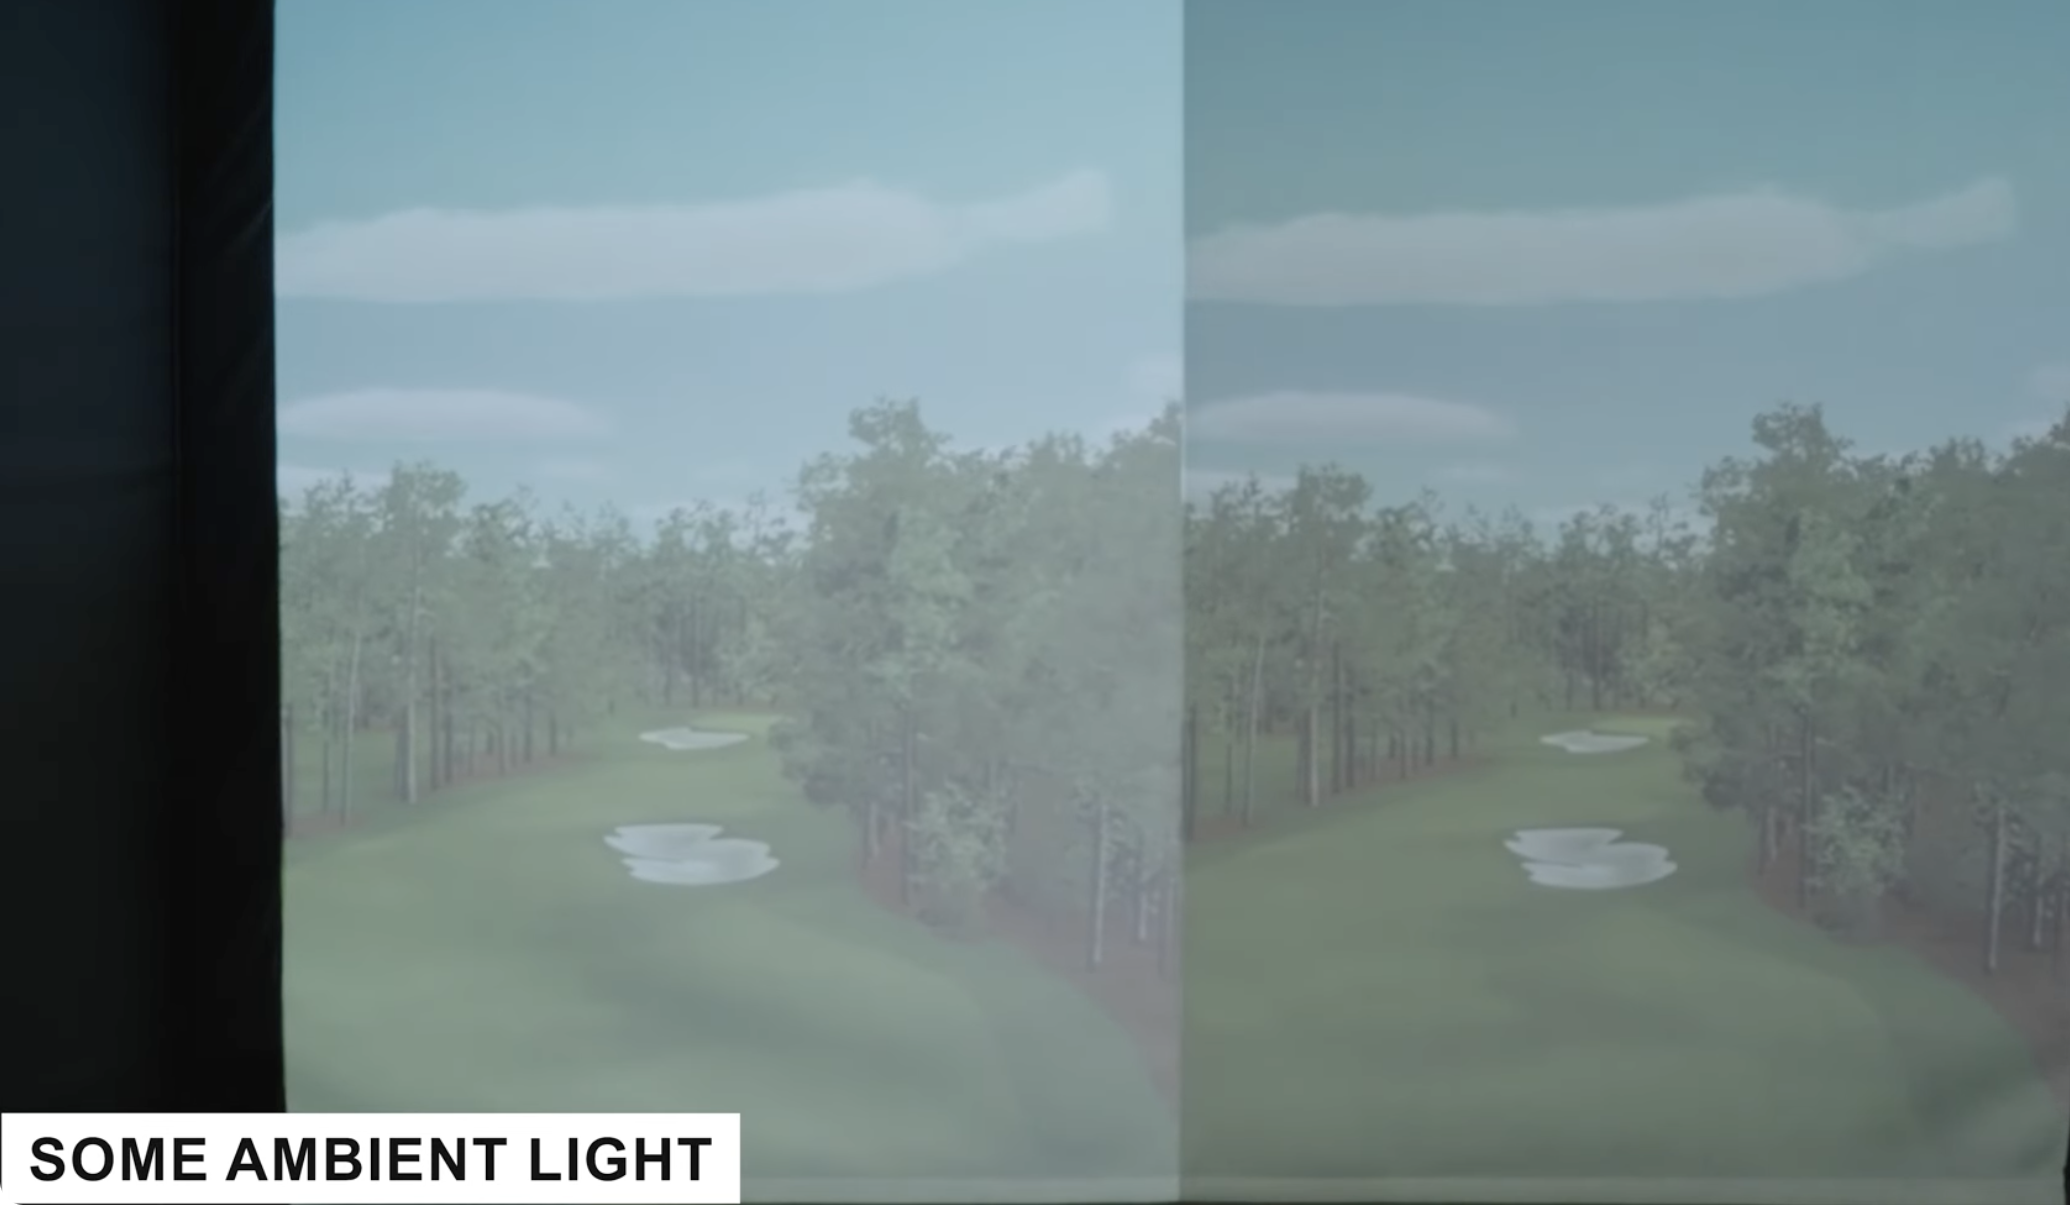
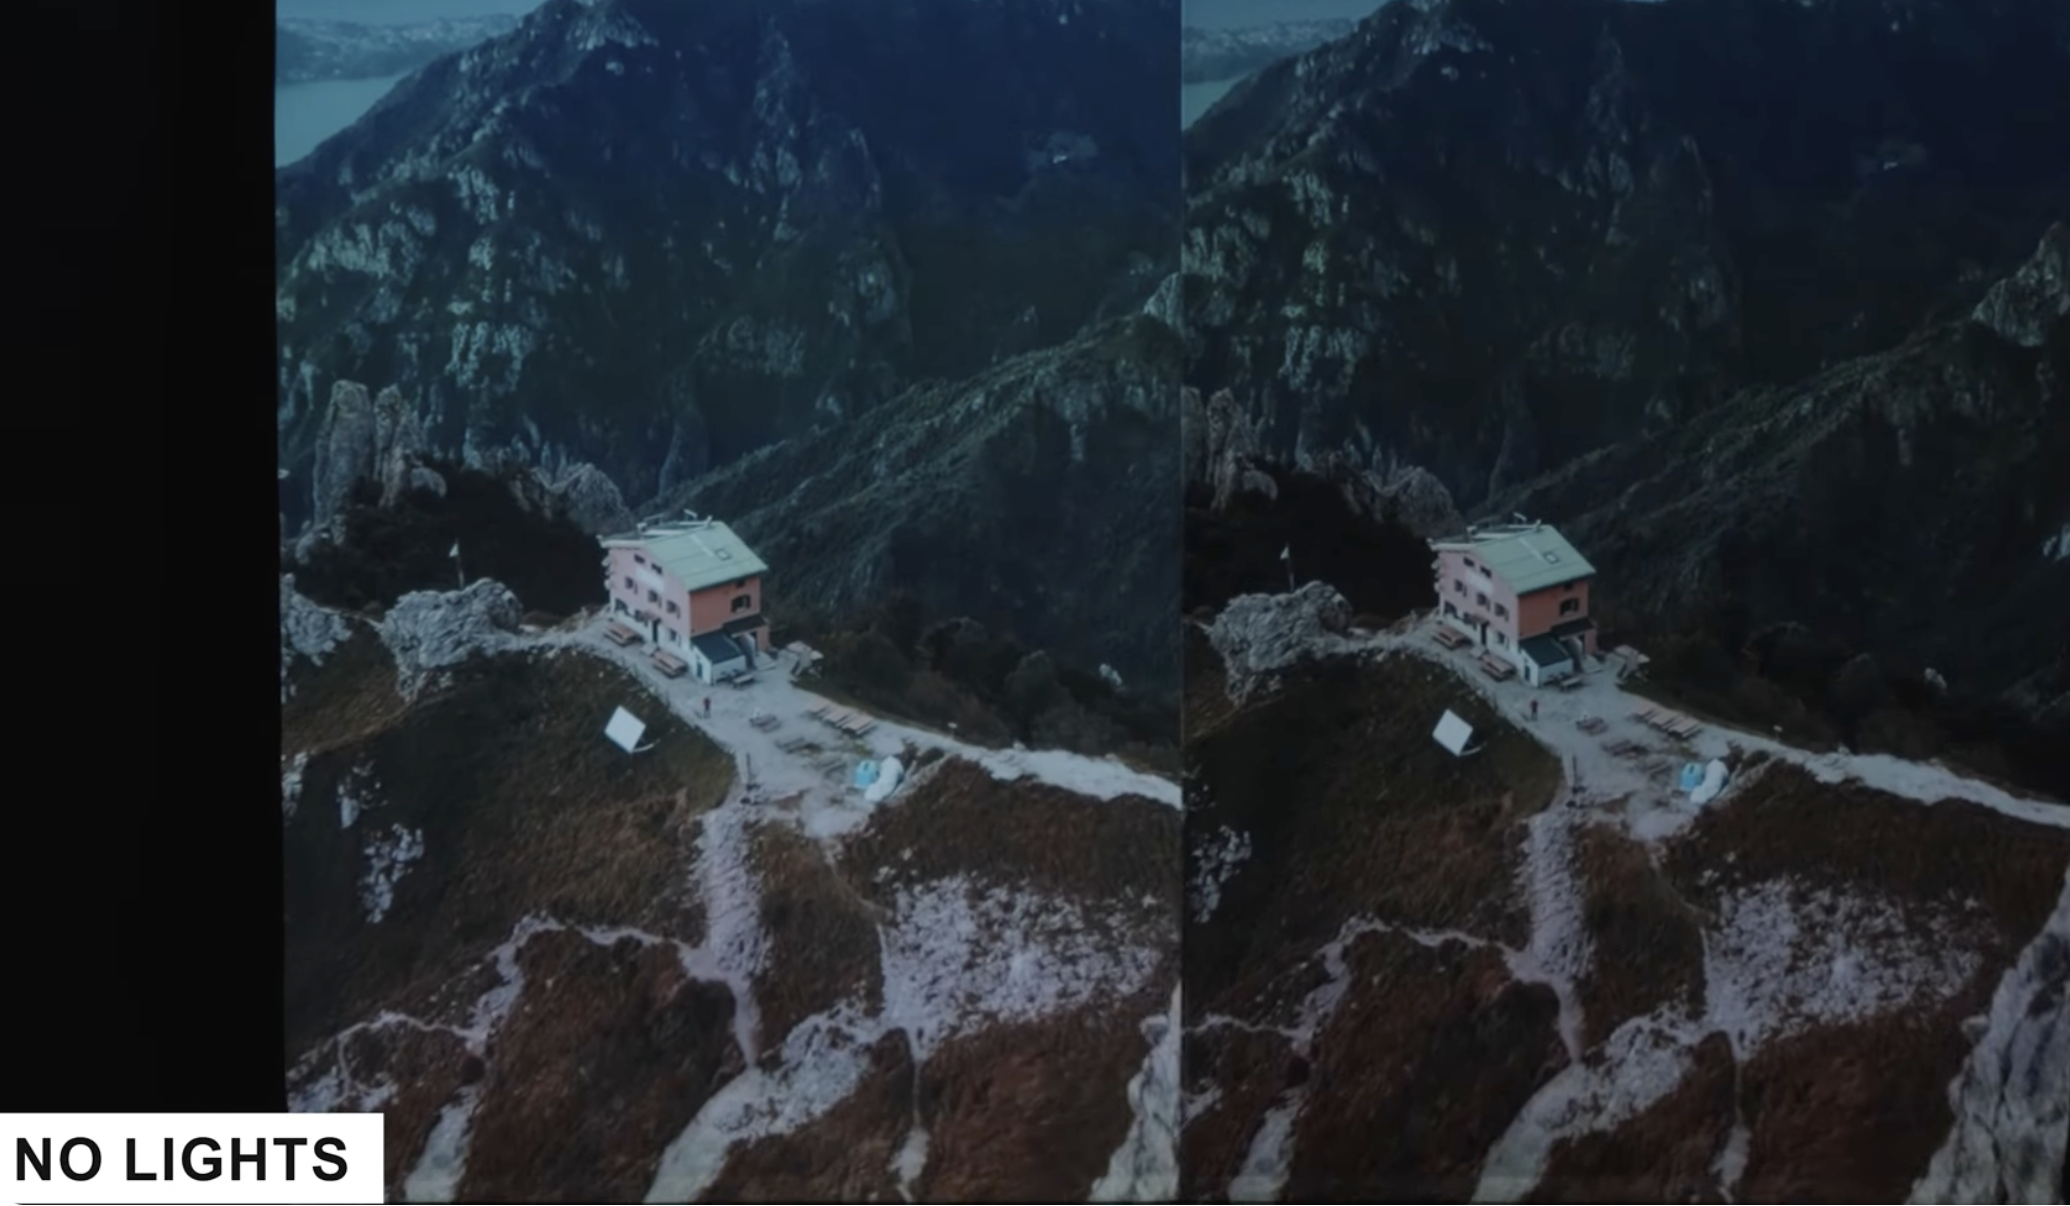
- Why Screen colors matter: Gray screens help to absorb light so dark areras stay dark without washing out color. The screen shots below show the difference between White and Gray screens. The gray screen is the right side of the screen.
3. Enclosure / Frame
The enclosure holds the screen in place and contains any errant shots.
- Side barriers and rear netting prevent balls from bouncing around the room
- Frame materials: steel tubing (heavier, more permanent), aluminum (lighter, easier to assemble)
- Most enclosures come in standard widths: 10 ft, 12 ft, 15 ft
- Ceiling baffles (optional but helpful) catch high shots that clear the screen
- Some enclosures include a top baffle — worth it for aggressive swingers
4. Projector
Projects the simulator software onto your impact screen.
Two main types for simulators:
- Short-throw projector: Sits 4–8 ft from the screen. Good for tight rooms. Risk: golfer’s body can partially block the image during the swing if mounted low.
- Ultra-short-throw projector: Sits 1–3 ft from the screen. Minimizes shadow issues but is more expensive.
- Long-throw (ceiling mount): Mounted overhead and behind the golfer. Cleanest setup, no shadow risk, requires ceiling space and mounting hardware.
Key specs to look for:
- Lumens: 3,000+ for rooms that can be darkened; 4,000–5,000+ if you can’t fully control ambient light
- Resolution: 1080p works fine; 4K is noticeably better for image quality
- Throw ratio: must match your available projector-to-screen distance
- Contrast ratio: higher = better image depth
Popular models: BenQ LH730, BenQ TK700STi, Optoma ZU506T, Epson LS800
5. Hitting Mat
Where you stand and swing. Don’t overlook this.
- Size: At minimum 5×5 ft. A full mat (5×10 or larger) looks better and gives room to move your feet.
- Fairway vs. rough options: Higher-quality mats have separate hitting zones with different turf textures
- Tee options: Look for mats with adjustable rubber tees built in. Some have low/medium/high tee options.
- Foam vs. rubber base: Foam is gentler on joints. Rubber is more durable. Premium mats layer both.
- Important: A cheap mat will transfer shock to your wrists over time. This is one place not to cut corners if you’re practicing frequently.
6. Computer / PC
Runs the simulator software. Most simulator software has minimum and recommended specs.
- Most modern simulator software requires Windows 10/11 (some support Mac)
- Minimum specs for smooth play: Intel i5 or AMD Ryzen 5, 16GB RAM, dedicated GPU (Nvidia GTX 1660 or better), SSD
- Recommended specs: Intel i7/i9 or Ryzen 7, 32GB RAM, Nvidia RTX 3060 or better
- Some launch monitors come bundled with a PC or have a tablet-based option
- Mini PCs (like Intel NUC or Beelink) work well for space-saving setups if properly specced
Simulator Software
What simulator software does: Renders 3D golf courses, takes shot data from your launch monitor, and simulates where your ball lands on the virtual course.
Top simulator software platforms:
| Software | Best For | Pricing | Compatible Monitors |
|---|---|---|---|
| E6 Connect | Most popular, wide course library | ~$199/yr | Most major monitors |
| GSPro | Realistic ball physics, growing course library | ~$250/yr | Most radar + camera |
| TGC 2019 | Huge course library (100,000+) | One-time purchase | Wide compatibility |
| Awesome Golf | Clean UI, good for casual play | Subscription | Select monitors |
| WGT Golf | Free entry tier | Free / paid tiers | Limited |
| Garmin Golf App | Built for R10 users | Included with R10 | Garmin R10 |
Tip: Before buying a launch monitor, confirm which software it’s compatible with. Some monitors are locked to proprietary software (e.g., Trackman IQ, Foresight FSX) and require paid subscriptions on top of the hardware cost.
Setup Types with Realistic Budget Ranges
Entry-Level Setup — $1,500 to $3,500
- Portable radar launch monitor (Garmin R10 or Rapsodo MLM2PRO)
- Net Return or similar hitting net (no projector)
- Basic hitting mat
- Practice-focused: works with simulator software via phone/tablet, no projection
- Best for: garages, limited budgets, or golfers who want data without the full immersive setup
Mid-Range Setup — $4,000 to $10,000
- Mid-grade launch monitor (Bushnell Launch Pro, Mevo+, or Uneekor QED)
- 10-ft enclosure with quality impact screen
- 1080p or 4K short-throw projector
- Hitting mat with tee options
- Budget PC or existing gaming computer
- Full simulator software subscription (E6 or GSPro)
- Best for: dedicated home rooms or garages, regular practice and casual play
High-End Setup — $12,000 to $30,000+
- Camera-based launch monitor (Uneekor EYE XO2, Foresight GC3 or GCQuad)
- Premium enclosure with side baffles, ceiling baffle
- 4K projector with ceiling mount
- Full-size mat with foam/rubber hybrid base
- High-spec PC or provided workstation
- Multiple software subscriptions
- Optional: side cameras, lighting, seating, scoreboards
- Best for: permanent dedicated simulator rooms, commercial setups, or golfers who want the full experience
Installation Considerations
Flooring:
- Concrete works fine under a mat
- Rubber gym flooring adds cushion and protects the floor
- Avoid carpet under the mat — it shifts and can create uneven footing
Lighting:
- Dimmable overhead lighting is ideal
- Ambient light washes out projector image — blackout curtains or no windows is better
- Some setups use LED strips for ambiance (behind the enclosure)
Sound:
- A Bluetooth speaker or basic sound system connected to the simulator PC improves immersion significantly
- Soundproofing the room reduces impact noise if you’re in a shared building or near bedrooms
Power:
- Most setups run fine on standard 120V outlets
- Ceiling-mounted projectors need a dedicated power run — plan for this before finishing walls
- A UPS (uninterruptible power supply) protects your PC from power spikes
Ventilation:
- Garages and enclosed rooms get warm. A fan or mini-split keeps things comfortable during long sessions.
Most Common Mistakes
- Buying a launch monitor before measuring the room. Radar monitors need depth. Camera monitors are more forgiving. Know your space first.
- Underestimating ceiling height. The swing arc of a driver can reach 8.5–9 ft at its highest point for taller players. If your ceiling is exactly 9 ft, test your swing height before building.
- Buying a cheap impact screen. Thin screens fail fast and create safety hazards. Budget for a quality screen.
- Ignoring software compatibility. A launch monitor that doesn’t support your preferred software is a frustrating limitation.
- Skipping the mat. A flimsy mat causes joint strain over time and doesn’t simulate real turf conditions well.
- Projector throw distance miscalculation. Always use the manufacturer’s throw ratio calculator before purchasing. A projector that doesn’t fit your room is a headache to return.
FAQ
Do I need a projector to use a golf simulator? No. Some setups use a monitor or TV instead of projecting onto a screen. It’s less immersive but more affordable and works fine for data-focused practice.
Can I use a golf simulator in a 2-car garage? Yes — a standard 2-car garage is one of the most popular spaces. Just confirm ceiling height at the hitting position.
What’s the most important component to spend money on? The launch monitor. Everything else can be upgraded over time. A poor-quality monitor gives you inaccurate data, which defeats the purpose.
How long does it take to set up? A modular enclosure with a short-throw projector can be assembled in 4–8 hours. Permanent installations with ceiling mounts take longer and may need an electrician.
Can multiple people use the same simulator? Yes. Most software stores individual player profiles. You can set up the system for multiple users with different handicaps, club sets, and settings.
Does it work with any brand of clubs? Yes. As long as you’re hitting a real golf ball, the launch monitor reads your clubs the same way. Some monitors track individual clubs for detailed performance analysis.
Ready to Build Your Setup?
Browse our complete simulator packages — everything matched, priced, and ready to ship.